Jarte - Free Word Processor and WordPad Replacement
Contents
- Index
Clip List
The Clip List tool is displayed by the Clip List button on the Main Tools panel. The Clip List provides access to the last 25 items copied to the Windows clipboard. The items can be quickly copied back to the clipboard and pasted in the current document. Note that, if desired, the Clip List can be disabled using the D command line switch.
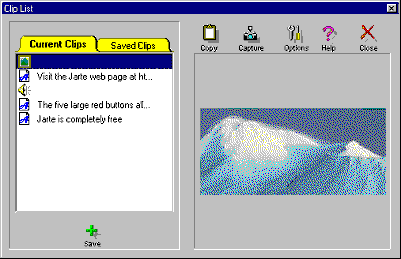
Current and Saved Clips: Clip List organizes clip items into two separate lists:
Current Clips: Lists the 25 most recent clip items copied to the Windows clipboard. The top clip item in the list represents the current contents of the Windows clipboard.
Saved Clips: Lists any clip items that have been saved. Items in the Saved Clips list are only saved until Jarte exits, unless you are using Jarte Plus.
Jarte Plus remembers saved clips even after exiting the program. The next time Jarte Plus is started the saved clips are restored to the Saved Clips list. Use this feature to save often used clips, remember scraps of information such as web addresses, save images and sounds, or even store small documents you don't want to bother to save to a file. You will probably come up with many of your own uses for the Clip List.
The icon next to each clip item indicates the content type of the clip. The icons have the following meanings:
 - Rich text
 - Plain text
 - Image
 - Sound
 - File
 - Unknown
Save: Saves the selected clip item in the Current Clips list to the Saved Clips list. This button is disabled if Jarte is sure the selected clip item is already in the Saved Clips list or if there are no clip items in the Current Clips list.
Remove Styling: Converts the selected rich text format clip in the Saved Clips list to plain text by any removing any font and paragraph styling from the clip. Removing the styling from a clip is often useful because it allows the clip to take accept whatever font style is in use at the point it is pasted into a document (i.e., the clip will blend with the surrounding text when pasted). Leave a clip as rich text format when you want the clip's font attributes to be retained just as they are regardless of the font being used at the point the clip is to be pasted into a document (i.e., you want the clip's appearance to remain exactly the same when pasted).
Remove: Deletes the selected clip item from the Saved Clips list. This button is disabled if there no clip items in the Saved Clips list.
Clear: Deletes all clip items from the Saved Clips list. This button is disabled if there no clip items in the Saved Clips list.
Move Up: Moves the selected clip in the Saved Clips list up one position in the list. This button allows you to organize the clips in the desired order.
Move Down: Moves the selected clip in the Saved Clips list down one position in the list. This button allows you to organize the clips in the desired order.
Clipboard: The action performed by this button is depends on the setting of option Clipboard Button Action. Double clicking on a clip item in the Current Clips list or Saved Clips list performs the same action as pressing the Clipboard Button. This button is disabled if the selected button action is Copy and the top item in the Current Clips list is selected.
Tip: Right click on the Clipboard button to display a menu that allows the button's default behavior to be overridden. The menu allows you to choose whether you want the selected clip to only be copied to the Windows clipboard or whether you want the clip to be both copied and pasted.
Screen Capture: Allows a selected portion of the screen to be copied to the Windows clipboard as an image. Use the following steps to perform a screen capture:
1. Click the screen capture button. The Jarte window temporarily disappears to the taskbar so it is out of the way. The mouse cursor is changed to a crosshair indicating Jarte is now ready for you to select a portion of the screen.
2. Click on the screen where you want to establish the upper left corner of the screen capture.
3. Move the mouse and click on the screen where you want to establish the bottom right corner of the screen capture. The portion of the screen selected with the two corners is now copied to the clipboard and the Jarte window reappears.
Click on the top clip item in the Current Clips list to view the image captured to the clipboard. A screen capture can be aborted before completion by pressing the Escape (Esc) key.
Tip: The arrow keys can be used to make fine adjustments to the position of the crosshair cursor both before clicking to establish the upper left corner and before clicking to establish the lower right corner. The Enter key can be used to establish a corner instead of clicking the mouse. The upper left corner can be fine adjusted even after it is established by pressing the Control (Ctrl) key while using the arrow keys.
Tip: Here are three other ways to perform screen captures:
1. The entire screen can be instantly captured to the clipboard by pressing the Print Screen key.
2. The active window can be instantly captured to the clipboard by pressing the Alt key and the Print Screen key at the same time.
3. The Internet Explorer web browser allows an image to be copied from a web page to the clipboard by right clicking on the image in the browser and selecting Copy.
Options: Provides access to the following options:
Stay on Top: Controls whether the Clip List is always on top of the main Jarte window. If this option is turned off the Clip List can be brought to the top at any time by clicking the Clip List button or by clicking on the Clip List itself if it is positioned so that it sticks out from under an edge of the main Jarte window.
Store Changes to Saved Clips : This option is only available for Jarte Plus. It controls whether changes to the Saved Clips list are stored when Jarte exits. Turn this option off to prevent any permanent changes to the Saved Clips list.
Clipboard Button Action: Controls the action performed by the Clipboard Button. The two available actions are:
Copy: Copies the selected clip item to the clipboard.
Paste: Copies the selected clip item to the clipboard and then pastes it into the current document. A small red arrow appears on the Clipboard Button if Paste is the selected action.
Help: Displays this help window.
Close: Closes the Clip List window.
Clip Viewer: Displays the content of the currently selected clip.